Saving and sharing your data
Faq Items
OneDrive
What is OneDrive?
OneDrive is Microsoft’s cloud file storage solution and provides you with one terabyte of free storage space. With OneDrive, you can sync files between your computer and the cloud, so you can get to your files from anywhere - your computer, your mobile device, and even through the Office 365 Portal at www.office.com.
Where do I find OneDrive?
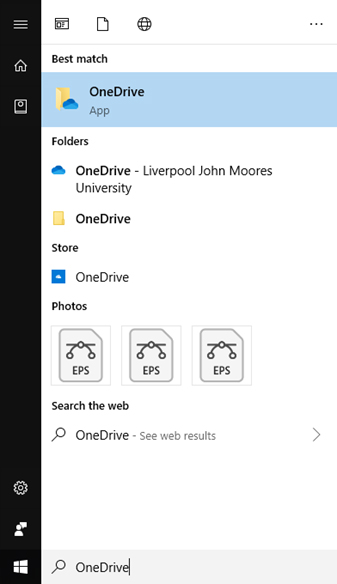
We have already installed the OneDrive app on all LJMU staff PCs and laptops, you will find it by clicking on the Start Menu and typing OneDrive (see screenshot below)
|
|
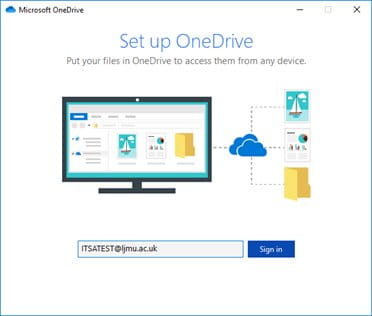
Once you have run it you will be asked to sign in, enter your USERNAME@ljmu.ac.uk and click Sign in (see screenshot below)
|
|
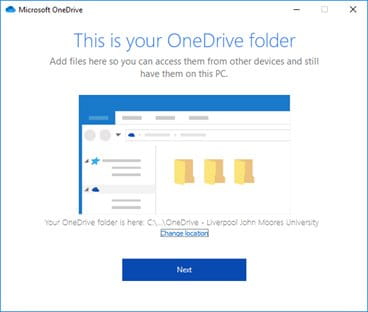
You will be then told the location for your sync folder, we suggest leaving it as default on our managed clients and clicking the Next button (see screenshot below)
|
|
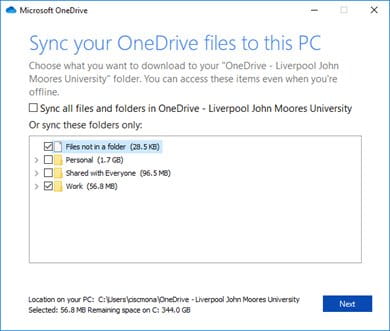
Next you will be asked which folders you want to sync from your OneDrive to this computer, just tick the ones you need and click Next (see screenshot below)
|
|
Please note
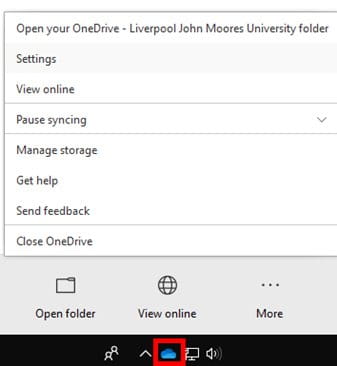
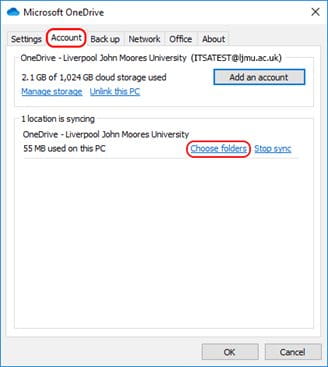
If you want to change which folder/sub-folders are synced, click the OneDrive app in the system tray and choose Settings and then ‘click Choose folders’ under the Account tab, then select which folders you want to sync from your OneDrive to the current computer (see screenshots below).
|
|
|
How can I access my OneDrive if I don’t have the app installed?
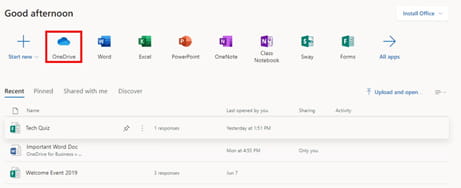
You can access your personal OneDrive from any browser, anywhere in the world. Go to https://www.office.com and sign in with your USERNAME@ljmu.ac.uk and your current password and click on the OneDrive icon (see screenshot below)
|
|
Can I share my files in OneDrive?
Yes, very easily and is one of the great strengths of OneDrive. You can do it in either the web interface or from your computer, look below to see how to do it.
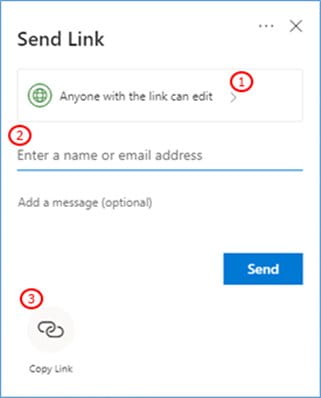
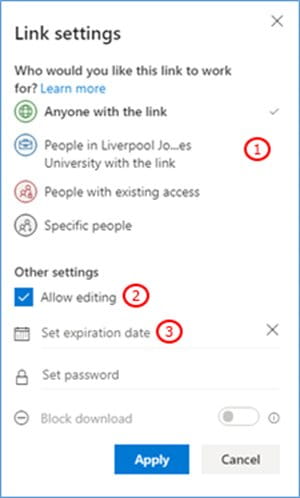
When you are in your OneDrive within a web browser, right click a file or folder and choose Share and you should see a menu like in the screenshot below. When accessing your OneDrive files from File Explorer you can right click a file or folder and click on Share, the menus for both web or on your computer are identical.
|
|
|
|
|
Click Apply to save those settings and then click Send when you are happy with the people you are sharing with and the settings you have specified, you will get a confirmation message and email the link has been sent that the file is being shared (the recipient(s) will also get a confirmation email. |
You can easily see which of your files are shared from within OneDrive on the web and change options or add more people who can access the file or folder by clicking the Shared icon:
 |
If you add, change, or delete a file or folder in your OneDrive folder, the file or folder is added, changed, or deleted on the OneDrive website and vice versa and if you delete a file from OneDrive it can easily be recovered from the recycle bin within 30 days. You can work with your synced files directly in File Explorer and access your files even when you’re offline. Whenever you’re online, any changes that you or others make will sync automatically.
We have up-to-date information on our IT Help Pages.
Transferring your M Drive into OneDrive
At LJMU we offer all our staff and students 1TB (A lot!) of OneDrive storage space, and we’re moving over to using this as our main storage for your personal work files. The following guide will show you how to move your files from your M drive, into your OneDrive.
Step 1: Enable OneDrive Agent
Please follow the OneDrive guide in the above section to enable and set up OneDrive. This is the easiest way to transfer files into OneDrive.
If for some reason you cannot install the OneDrive agent, skip to Step 2.2
Step 2.1: Copy Files Using the OneDrive Agent
The easiest way is doing it all through Windows explorer on your desktop:
Open your M drive folder by clicking the desktop shortcut for M Drive.

Browse to the files you want to copy from your M drive. I have labelled mine as Folder 1, Folder 2, Folder 3. Select all these folders by click and dragging or hold control and click on each one in turn, then right click on one of them and select “Copy” from the menu.

You can now browse to your OneDrive, which if you have followed the steps in the guide from earlier, will be visible in your “my documents” on the menu to the left:

Once in this folder you will see some folders already created. This is because LJMU automatically backs up documents from your My Documents and your desktop into your OneDrive folder for safety. You can now create your own folder structure or paste the copied documents into the one drive folder by right-clicking inside the folder and choosing “Paste” from the options.

Once you have done this, it could take some time to upload your files to the cloud storage of OneDrive. You can see upload progress on the OneDrive tool in your taskbar at the bottom right of the screen or you can wait for the documents to get the green tick in the “status” box, which means they have successfully uploaded.

Step 2.2 Copy your Files without OneDrive Agent
The second way of copying your files is only necessary if you do not have the OneDrive agent set up on your device.
First access your OneDrive by going to the website:
You can now sign in with your username@ljmu.ac.uk and your password. This will log you in to your Office 365 account, and you can click OneDrive from the list of programs:

You will now see your OneDrive folders and content in a web page. From here you can choose to upload more files into your OneDrive using the “Upload” button. If you want to upload single files, choose “File” and if you want to upload whole folders, choose “Folder”:

You can now select the folders you want to upload by browsing to your M drive in the left-hand menu. It can be found under “This PC”, and is visible in the screenshot below:

Choose the folder or File you wish to transfer and click “Upload”.
You can see the progress of your upload by clicking on the “Progress” button in the top right of the web page:

Once this has completed all your files you selected will now have uploaded to OneDrive and be available on device by accessing OneDrive on or off campus.
Microsoft Teams
- Each Team is subdivided into one or more channel and all content for a Team is contained within its channels.
- Every channel has its own files folder where you can share files on that specific channel.
- To access that folder, go to the channel and select the Files tab at the top of the window.
Please note
Make sure to use the Files tab at the top of the channel conversation window instead of the Files button on the left side of the app. That button gives you access to all your cloud files, rather than just the files for a specific channel.

It is worth noting that any files you upload will be accessible by any member of that team
Once you’ve opened the Files tab you should see all the files and folders currently uploaded to that channel
In the Files Tab you have a number available to you to manages your files
New
• By selecting the New option, you are presented with a drop-down menu which allows you to create a new document or a new folder. We don’t recommend that you use this option to create documents as you have less functionality in Teams than other Microsoft applications such as Excel and Word. However, we do recommend creating and using folders to organise your files and data.
• To create a folder, select Folder in the drop-down menu

• You should now be prompted to enter a folder name

• Upon clicking create, the new folder will appear in the list of files as a new item

• To move a file already uploaded to the channel into the folder, right click the file and select Move

• Then select the folder you wish to move the file too and click Move

Upload
• Clicking this tab presents you with a drop-down menu which allows you to upload existing files or folders into your library:

• Clicking Files allows you to browse and select a file (or multiple files by holding the Ctrl button) to upload:

• Click Open once you have selected the relevant files and should see confirmation that the files have been uploaded to your library:

• Selecting the Folder option allows you to upload a selected folder and all its contents in one click. This works in the same way as Files except instead of asking to open the files it asks you to Select Folder:

Please note
You can also drag and drop files into the library. Using your mouse, drag the file from where they are currently located and drop it on the Teams window among the files.
Additionally, any files dropped or copied into a channels chat will also automatically appear in the channels library.
Download
• Download allows you to download all files, folders and sub folders in your current document library. It does so in a .zip format and, by default, saves it to your downloads folder
• Teams will notify you when the download has finished:

Add Cloud Storage
• This allows you to add a SharePoint site as a folder to your channel
• Ensure that you select a SharePoint site hosted outside of teams (use a SharePoint link)

• Once you have selected a site click Next and you will then be prompted to select the Folder you want to add, click Next again:

• you will then be asked for confirmation, click Add Folder

• The SharePoint Site folder will now appear as a folder within your Teams Channel Library
• Unlike uploaded documents only people who already have access to the SharePoint site will be able to view and access files in a SharePoint Folder
SharePoint
SharePoint is a collaboration utility by Microsoft. It is used widely across the University allowing us to share documents, information and ideas both internally and externally. All LJMU committees are organised through SharePoint and it acts as a central source for all information allowing staff to be much more efficient. SharePoint allows you to co-ordinate projects using a centralised calendar, task list and schedule with full control over the information in a familiar and structured manner. SharePoint is available for staff use and people external to LJMU can be invited to collaborate and share information.
Accessing SharePoint
SharePoint can be accessed through a modern web browser such as Internet Explorer or Google Chrome. IT Services can create a SharePoint site for you and will send you a unique URL to enable you to access your site. It is not possible to browse through SharePoint sites so you would need to know the exact URL to access it. (Make sure you add it to your ‘favourites’ in your web browser so you can find it again).
Requesting a SharePoint site
If you are interested in a SharePoint site and would like IT Services to create one for you, you can request it via our Self-Service Portal - Click on ‘SharePoint’ then 'New SharePoint Site'
Research data (Ctera)
Using LJMU Ctera For Research Data
To gain access to Ctera or request additional storage capacity please submit a request via Helpme.
LJMU provide large-scale cloud hosted storage for researchers to upload and share their research data called Ctera
Access Ctera
You will be presented with a login screen, and you login with your normal LJMU username and password (Remembering the @ljmu.ac.uk after your username)

Once you’ve logged in you will be presented with the main dashboard.

1. Your main Cloud Drive. This is where you can create folders and upload files. Your main files will show here.
2. Shared menu. Here you can see which files you have shared, and files that have been shared with you.
3. Total data allowance. Here you can see how much data you have in total and how much of it you are using.
Creating a New Folder
Creating a folder and uploading documents is done in a very similar way to many popular cloud-based storage solutions such as Microsoft OneDrive.
First you need to create a folder to store your data. Select New and choose New Folder as shown here:

Give your folder a name and then click Create:

Your newly created Folder is now visible on your main Cloud Drive screen:

By clicking on the folder you can see its contents and add new contents:

Uploading New Files or Folders
There are two ways to upload new files or folders into your folders:
1. You can click and drag from a Windows folder into the blank space in the middle of the screen. This will automatically start uploading anything you drag into this area. Using this method you can upload entire folders and their contents by dragging the folder from your computer into the web browser.
2. You can use the Select files to upload option directly from a folder and then browse through your computer to the files you need, selecting the ones you want to upload. You can upload multiple files by holding the Ctrl button as you select them, but you cannot upload folders directly. When you click open the files will begin uploading and you will be able to see a progress bar at the bottom of the screen:

![]()
Once your files have finished uploading, they will be visible in the folder they were uploaded to

You can see the name of the user who has created the folders or files and a timestamp of when it was added.
Sharing Files or Folders
There are two different methods of sharing access to files or folders within Ctera. Both can be used to give internal or external users access to the data.
• The first method is creating a public link to access a folder, and anyone who is given that link will be able to access the contents.
• The second is by adding users to allow them access using their email address.
Creating a Public Link
When you select a file or folder you will see several options on the right. The first of which is a hyperlink symbol as shown below:

When you click on the button you will be shown the following menu:

When you click Create New Link it automatically then creates and gives you the link to access the files:

Using the options next to the link, you can set the permissions that those using that link has:
• Preview only allows them to see the files but not their content.
• Read Only allows them to open and view the contents of the files/folders shared.
• Read/Write allows them to edit any files/folders shared.

The next option allows you to set an expiry date on the link. This is useful if you only want to allow access for a specific period of time. Once the expiration date is reached the link will no longer work:
The last option in the menu allows you to remove the link if it is no longer required.

As you can see you can create numerous different links with different permissions and expiry dates.
We do not recommend creating links to share our data as any person coming into possession of the link can access your data regardless of how they obtained that link.
Sharing a folder with specific users
The next sharing option can be selected by choosing the silhouette that indicates sharing:

You will now be shown the sharing files menu:

1. This area shows the list of users who already have access to the file or folder.
2. Clicking here will give you the option of either adding an individual via email or adding a group of users.
3. Here is where you type the user’s details. If it is an internal LJMU user, you can search by name and it will search the LJMU directory for that user. If it’s a group and you’ve set it to groups, it will also search the directory for the groups. If you are inviting an external user, you can type their full email address here and it will send them an email with details of how to access the data.
Once you have added a user they will show up in the list:

Once again, as detailed previously, you can choose what permissions the user has, add an expiration date to their access if required or remove their permission completely.
On the left side of your Ctera dashboard you have some useful options to help you quickly navigate through your files.

1. Cloud Drive returns you to your main Ctera dashboard showing you all the files you have access to.
2. Shared By Me, will show you only the files and data you have shared with others, allowing you to quickly review permissions and control your data.
3. Shared With Me, shows you only those files and data that others have shared with you and you still have access to.
File Options
You can access the file options by clicking on the ellipses/more options for a file.

Here you can

• Download – Downloads the file to your device
• Preview – Preview the file in Ctera without opening the file
• Version History – Allows you to review the version history for that file
• Copy/Move – Allows you to copy and or move the file to a different folder
• Rename – allows you to rename the file
• Copy Permalink – Do Not use
Please note
In various places throughout Ctera you will see the option to create a permalink. DO NOT create permalinks as this is not a secure and maintainable method of sharing your data and grants permanent access to your files.
Premium storage (JT2)
LJMU Staff can apply for a small file share on the premium service free of charge. An initial 1GB of disk space will be allocated at set up and can be incremented further as and when needed.
This service offers a number of advantages over local file stores on individual PCs.
The advantages include:
- Premium Disks
- Replicated across server rooms for maximum availability
- They are backed up every night.
- Back-up tapes are held off-site for security (standard shares and production servers only)
- They are available from anywhere, over the network
- They are not subject to the same hazards of theft or damage as local drives.
Ideal for:
- Business critical information (requiring guaranteed availability)
- Volatile data
- Live data
- Databases
- Websites
Externally Funded/Commercial Activity
If the file share is for the purpose of an externally funded project or for commercial activity, charges will apply. The charge is for a period of 4 years at the end of which you will be contacted and offered the option to renew. See ‘ITS Chargeable Services’
Non LJMU Staff
Charges will apply. The charge is for a period of 4 years at the end of which you will be contacted and offered the option to renew. See ‘ITS Chargeable Services’
Requesting a share on the Premium Service
IT Services can create one for you; please request it via our Self-Service Portal - Click on ‘Shared File Storage’ then 'New Premium Share for Core Business’ or ‘New Premium Share - Externally Funded/Commercial’
Large scale temporary storage for students
Students undertaking video editing may require large amounts (typically 3GB-10GB) of temporary storage for a short period (typically 1-3 months) to store their work. Lecturers can enable the automatic provision of large-scale temporary storage for all students on a designated module offering by following the instructions below.
A separate temporary storage area is allocated to each student on the designated module and is only accessible by that student. By default, neither their lecturer nor other students on the module are able to access a student’s temporary storage.
Please note:
- The lecturer making the request must be registered as a tutor for that module offering in Canvas
- A secure storage area will be automatically generated for each student enrolled on the module offering and an appropriate email notification will be sent to each student
- Students will access their temporary disk space by clicking on the link on their M: Drive. (see ‘The Student’s Role’ for more details
- Each storage area can only be accessed by the student to whom it has been assigned
- The storage areas are backed up on a nightly basis
- The temporary storage areas are deleted on the completion date of the module offering
The Tutors Role: Setting up the storage space
Stage 1: Selecting the Course
- Visit the Storage Server Request Start Page
- A web page will display showing what courses you are on within Canvas as a tutor.
- Select the course for which you want to create the storage area
Stage 2: Confirm details
The web page will now show information about the course selected in Stage 1, e.g.

Check the course details and if you are happy click on Create Storage to proceed - This will:
- Create the storage space
- Send an email to confirm that the storage area has been set up.
- Send an email to the enrolled students confirming information about the storage space and the shortcut link to the storage area.
Please note
This storage space will not be available after the time-line specified. You must back up any important work prior to the expiry of the temporary space. We will not be able to retrieve any files from the space after it is removed.
The students Role: using the space
All students enrolled on the module offering will receive an email containing information about the storage space and a shortcut link to the storage area.- e.g.
Your tutor has created a storage area for BBTJACK-201617-YR-AUG. A shortcut to it has been created on your Home Drive (M:\BBTJACK-201617-YR-AUGExtraStorage.lnk)
When you receive the email, go to your M drive and find the link relating to the module offering then click on the link to start using it. PLEASE NOTE: This storage space will NOT be available after the time-line specified. You must back up any important work prior to the expiry of the temporary space. We will NOT be able to retrieve any files from the space after it is removed,
Troubleshooting
Tutor: I am not sure whether I have set the space up already – how can I tell?
Visit the Storage Server Request Start Page and select the course as usual.
Check the ‘State’ – it should say ‘Storage Area Exists’
Student: I have deleted the email I received.
Ask your tutor to Visit the Storage Server Request Start Page
Your tutor can click on ‘Refresh Storage’ to re-send the email.
Student: I have deleted the link on my M Drive.
Ask your tutor to Visit the Storage Server Request Start Page
Your tutor can click on ‘Refresh Storage’ to re-send the email and re-create the link on your M: Drive
If you are still having problems, the tutor can visit the ITS Self-Service Portal and select "Ask a Question".

